The Adventures of Lolo 2 - Guide / Walkthrough
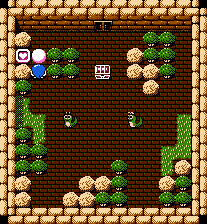
Room 1
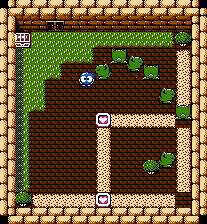
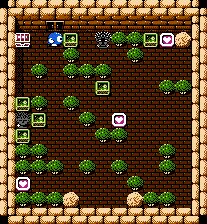
Snakey is a friendly harmless monster. If you need to move him out of the way, you will need to use the Magic shot to turn him into an egg first.
Grab the first Heart Framer and you will get a Magic Shot for Lolo. You can use this to turn enemies into an egg that he can push around. Use it on the Snakey and push him out of the way so you can grab the last Heart Framer. Now the chest will open so you can grab the Jewel and move on to the next room.
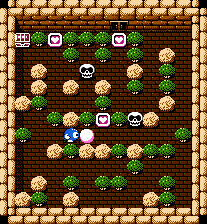
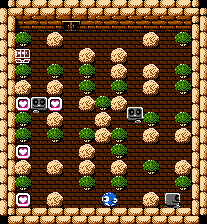
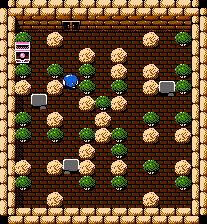
Room 2
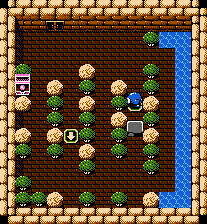
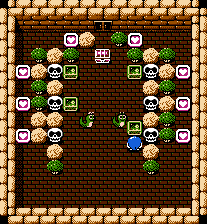
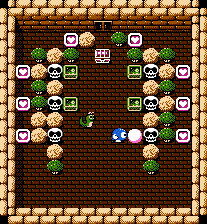
Skulls remain lifeless until Lolo collects all of the Heart Framers. They will then start patrolling the room looking for intruders.
Grab the 4 Heart Framers that you can reach right away and you will have 2 Magic Shots. Shoot the Snakey blocking your way once to turn him into an egg then immediately shoot him again to blast him out of the room. Grab all of the remaining Heart Framers then use the Magic Shot to turn the upper left Skull into an egg then blast him out of the room with your last shot. Once you grab the last Heart Framer, any Skulls in the room will become active so quickly run to the chest to clear them out.
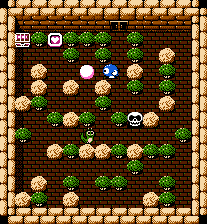
Room 3

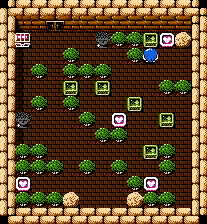
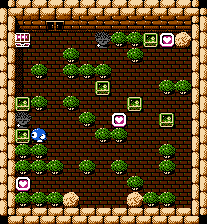
The Alma will start chasing Lolo right away. When it gets close, it will sometimes roll at Lolo and won't be able to change directions momentarily.
There is an Alma in this room that will chase Lolo around but fortunately he is blocked in his area by a Heart Framer. You will also see green Emerald Framers which Lolo can push around. Begin by collecting the Heart Framers around the room except the one blocking the Alma. At the bottom row of 3 Emerald Framers, push the left and right ones up one space then push the center one off to the side. On the next set of 3 Emerald Framers, move them in the same order. Lolo can walk over the treasure chest in order to grab the 2 Heart Framers. Now you can grab the final Heart Framer blocking the Alma but make sure you grab it right after he passes by to give yourself more time to get back to the Jewel in the opened treasure chest.
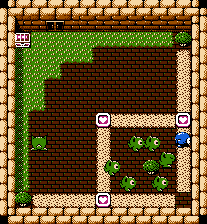
Room 4
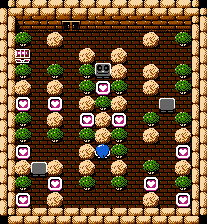
Leepers are harmless but they will fall asleep if they touch Lolo. They can easily block narrow paths so it's best to draw them into a more open area to let them fall asleep.
This room is full of Leepers which will fall asleep if they touch Lolo and become immobile. There are also patches of sand that hinder Lolo's movement. If you walk straight up, you should be able to get past most of the Leepers so you can grab the Heart Framers without worrying about getting boxed in.
Room 5
Though they won't harm Lolo if touched, Rockys will charge if they see him and can trap him in a corner.
The Medusa can't move but it will launch deadly spikes at Lolo if he crosses into their view in any 4 direction. Their shots won't be able to go through Emerald Framers, Heart Framers, stones or even other monsters! They can shoot through bushes though so use the Emerald Framers in this room to your advantage.
The Rockys in this room will sometimes charge Lolo and can block him in a small area, forcing you to restart the room. The Medusas are especially dangerous since they can shoot spikes at you if you cross into their line of sight in any 4 directions. These spikes can travel through bushes but not the Emerald Framers so you will need to push the Emerald Framers in the room around to block the Medusas and allow you to safely collect the Heart Framers. The bottom right Emerald Framer can block the Medusa on the right and allow you access to the top of the room. The upper right Emerald Framer can be pushed over and down to block the right Medusa again. The last Emerald Framer at the top of the room can then be pushed over to block the top side of the left Medusa, allowing you to safely pick up all of the Heart Framers in the room. Just don't get impatient and accidentally walk into their line of sight!
Floor 2
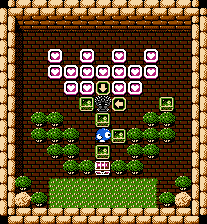
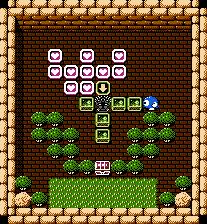
Room 6
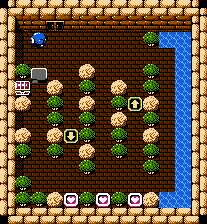
This is a very easy room if you can avoid being blocked in by the Rocky. You will see 2 tiles on the floor with a directional arrow. These special tiles can only be walked across in the direction the arrow is pointing. Begin collecting the Heart Framers in the upper left part of the room and work your way down. If the Rocky chases you, run back to the top of the room then quickly go back down around him. Duck into the corners to grab the Heart Framers but don't take too long since the Rocky will be right behind you!
Room 7
You may be tempted to start collecting Heart Framers but leave them there! Only one in the room is safe to grab and another is blocking the aim of a Medusa. Begin by pushing the bottom Emerald Framer all the way over to the right to reach that side of the room. Push the upper right Emerald Framer all the way up to safely grab the Heart Framer there. Walk around the Emerald Framers then push the upper left Emerald Framer to the left to block the top of the Medusa on that side of the room.
Now here's where it gets tricky - push the first Emerald Framer you moved one space up, left then down to position it to push over to the left side of the room. Use it to block the bottom or side of the Medusa there. Push the right most Emerald Framer to the left side of the room to completely block that Medusa off. Finally, push the center right Emerald Framer through the same path at the bottom part of the room then all the way up to block off the left side of the Medusa at the top of the room. You can now safely grab all of the Heart Framers and get to the chest.
Room 8
This room is a trap waiting to go off but you can push the Emerald Framers to block the Skulls in. The problem is that there are only enough Emerald Framers to block in 4 of the Skulls. Grab the bottom Heart Framer in the middle of the room and you will get 2 Magic Shots. You can use 1 Magic Shot on each of the Snakeys to push them in to block the 2 remaining Skulls, allowing you to pick up the rest of the Heart Framers and reach the chest.
Room 9
This room has 3 Rockys patrolling it that can easily block you in the narrow paths. You will have to keep moving and grabbing Heart Framers when the Rockys are far enough away not to block you in. Patiently walk around the middle part of the room until you see your chance!
Room 10
The Medusa in the center of the room may be blocked by the Heart Framers but the arrow tiles won't offer you any protection! Push the Emerald Framer on the left over to the left side of the Medusa. Of the 3 Emerald framers below the Medusa, push the center one to the right then go around and through the chest to push the bottom Emerald Framer up. The Emerald Framer you pushed right can then be pushed straight up to block the right side of the Medusa. Finally, the Emerald Framer on the right side of the room can be pushed over to the top of the Medusa after picking up some Heart Framers to clear the way. With the Medusa completely blocked in, you can pick up the rest of the Heart Framers.